I dedicate this tutorial to Marion H, a Dear Lady I needed to make something special for her birthday :-)
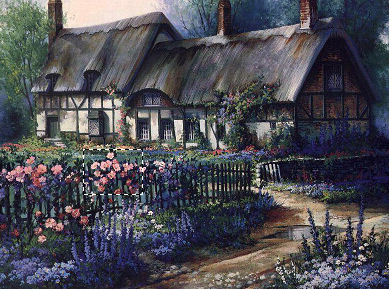
For this tutorial you will need a graphic.
No outside filters were used.
Unzip the textures to your textures folder in PSP.
Font and Dings put in their own folder and open from there.
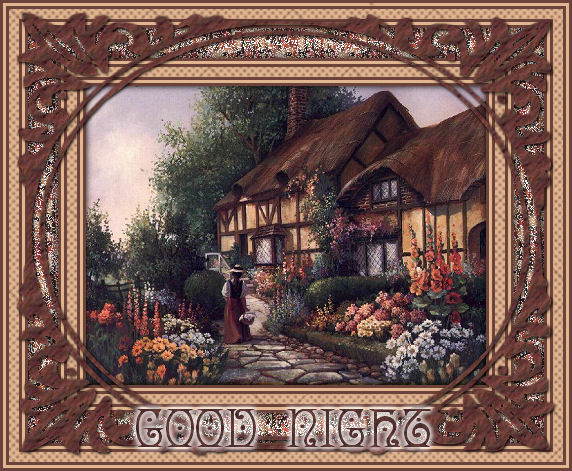
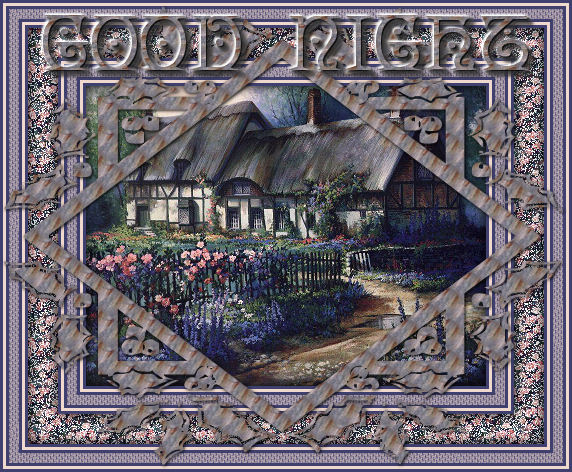
I will call this one Beginners.
Open the graphic you wish to use, Shift+D to duplicate it, then close the original.
Choose a light color from your graphic for the Foreground color and a Dark color for the Background.
This will be a pretty large frame, to keep the finished size down, I resized mine before starting so the longest side was 400px. Remember to Adjust-Sharpen after the resize!
The first thing we need to do is pull 2 patterns out of the graphic to use as pattern fills.
Choose your Selection tool with these settings.
The first selection will be to fill the large middle border of the frame. I chose some of the pretty flowers.
Edit-Copy. Edit-Paste-As a New Image.
Effects-Image Effects-Seamless Tiling at Default settings.
Activate the main image, Selection-Select-None.
The second selection will fill the ding frame and text. I choose the roof for that.
You might choose the tree leaves or different color flowers :-) Let your imagination help you choose!
Once you have your selection, again Edit-Copy, Edit-Paste-As a New Image. Effects-Image Effects-Seamless tile.
OK, Now we are ready to really begin work! LOL
Activate your main image. Selection-None.
Selections-Select All. Selections-Float.
Effects-3d-Cutout, with V & H at 0, Opacity 100 and Blur 20.
Selections-None.
****
We will repeat this border sequence 4 times, it begins at the **** and ends with **** as well.
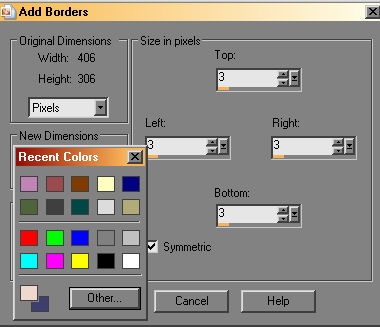
Image-Add Borders, 3px, symetrical, your dark Background color.
Image-Add Borders, 3px, your light Foreground color.
Image-Add Borders, 3px your dark Background color.
!!Tip!! In your Add Borders window, Right click on the color in the bottom left of the window, at the bottom left of the new window you will see your Foregound and Background colors, simply click on those to change your border colors!!
****
Image-Add Borders, 10px, your Foreground color.
Choose the new border with your Magic Wand and these settings.
Now we are going to play a bit :-)
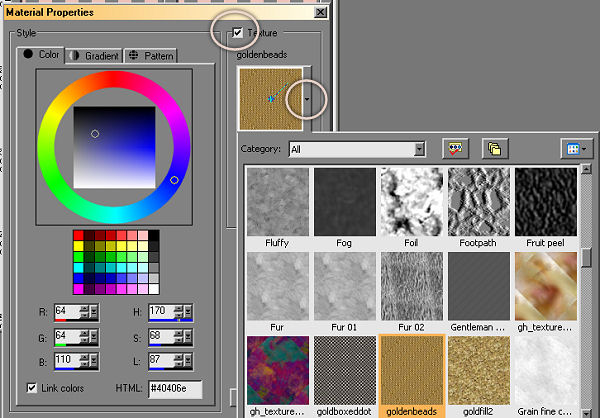
In your materials palatte, click on your Background color. Check the Texture box, and then in the arrow next to patterns, choose your texture.
In the example above, I used the Fine Canvas texture, in the one here, I used goldenbeads.
Selections-None.
**** Repeat the triple 3px border.****
Image-Add Borders, 30px symetrical, your Foreground color.
With your Magic Wand, same settings as before, choose that new border.
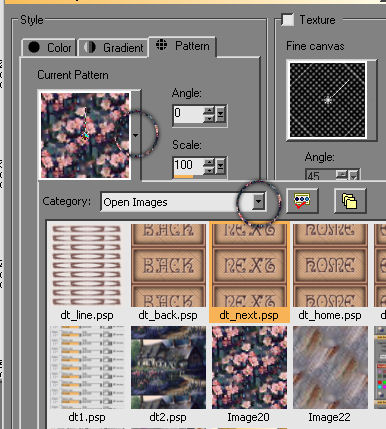
In your Foreground color box, click and choose pattern, then as below, click on the arrow next to current pattern and then in the new window choose the Open Images and find your floral pattern you made.
Floodfill the border with that pattern, keep selected.
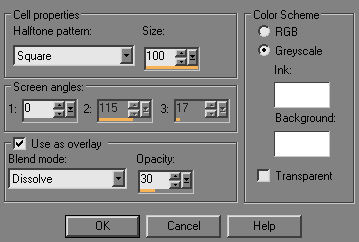
Effects-Artistic Effects-Halftone with these settings.
Keep selected, Selections-Float, Effects-3d-Cutout with the same settings as before.
Selections None.
**** Repeat the triple 3px border ****
Image-Add Borders 10 px. With your Magic Wand choose this border. You should still have the textured Background color in your Materials Palette, floodfill this border with the texture as before. Selections-None.
**** Repeat the triple 3px border ****
If you haven't yet opened one of the Ding files, double click on one now to open it.
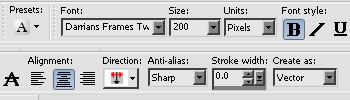
Choose your Text Tool with these settings.
In the Materials Palette, choose your Background and set it to Pattern, and the second pattern you made, mine in both cases here was from the roof.
In my top example I used the small letter "c", in the one below, a Capital "b".
You should be able to see the "ding" as you type, do a letter and then backup and delete it and try another until you find one you like. And, if you try one and it just doesn't work like you wish, right click on that layer in the layer palette and Delete, then try again :-)
Once you have your ding, grab the center node on each of the 4 sides and pull it out to the edge of your graphic.
This I can't give you a good example of because even a full screen capture does not show that when you put your cursor over this middle node, you will get an arrow pointing both up and down, or on the sides both right and left. When you get that double ended arrow, click and hold and drag it to where you want.
Once you are happy with your ding and it's placement, right click on that layer in the layer palette and Convert to Raster Layer.
Effects-3d-Drop Shadow, with V & H at 2, Opacity 100, and Blur 5, or settings you like :-)
Add text as you desire.
And you're done!!
I hope you had fun with it :-)