
I do not know the artist of the Teacup Floral, or the creator of the mask, but file names have been kept as I got them.
If they are yours, I will be happy to give you proper credit or take them down.

For this tutorial you will need a tube.
I used PSPx, but this will also work in 8 and above with little change
Paint Shop Pro X, you can get Here.
The tube, mask and font I used you can get Here.
This is a beginners using a Mask, and no outside filters were used.
Take this to the level you wish :-)
I'm going to start with steps for the tag as above.
Then I'm going to continue and we'll make the strip I used for the background here which you can use for a web page as I did, or an email stationery.
Finally, I'm going to tell you how you can make a real paper stationery with it and print it to use.
Open your chosen tube in PSP. Shift+D to duplicate, then close the original.
Pick a light color from your graphic for the Foreground, and a darker color for your Background.
Open WSL_Mask4 in PSP.
File-New Image, 500x500 pixels, Raster and Transparent both checked.
Choose your Flood Fill tool and fill the layer with your Foreground color.
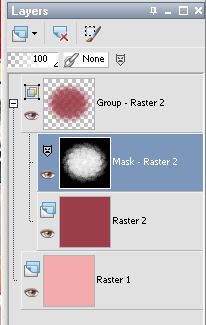
Layers, New Raster Layer.
Flood fill that with your Background color.
Adjust-Add/Remove Noise-Add Noise, with Random checked, Noise at 10, and Monochrome checked.
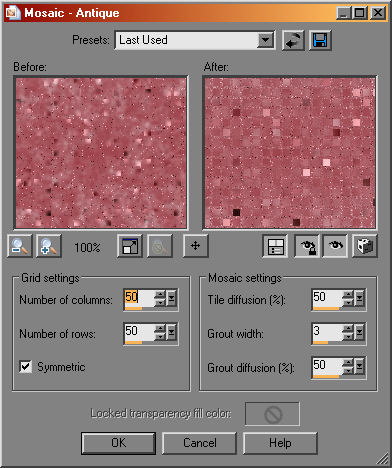
Effects-Texture-Mosaic-Antique with these settings.
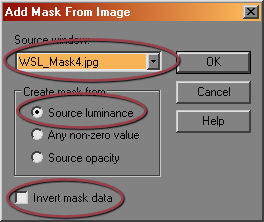
Layers-New Mask Layer-From Image.
In the new window, click on the arrow under Source window and pick WSL_Mask4.
Make sure Source luminance is checked and Invert mask data is Not checked.
In your layer palette, Right click on the Mask layer and choose Merge-Merge Group.
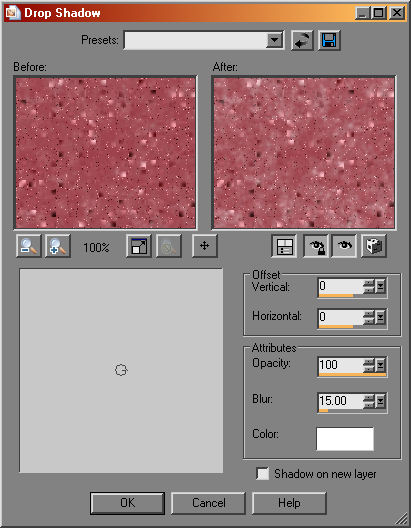
Effects-3d-Drop Shadow with these settings. Make sure you have White as the shadow color here.
Now, we're going to save that doily to use again.
Edit-Copy.
Edit-Paste as a New Image.
File-Save As and save it to a folder you will remember, name it and save it as a .psp file.
Close the WSL mask we used, we are done with it.
Activate the Doily you just saved and Minimize it.
Activate the tube you are using.
Edit-Copy.
Activate your 2 layer doily image.
Edit-Paste as a New Layer.
Image-Resize with these settings. Make sure Resize all layers is Not checked.
With your Mover tool, move the tube up a little, and the doily down a little so the teacup in sitting in the middle of the doily.
In the layer palette, highlight the bottom layer which should be your Foreground color.
Selections-Select All.
Selections-Modify-Contract, by 5.
Selections-Float.
Effects-3d-Cutout, Verticle and Horizontal at 0, Opacity 100, and Blur 15, Shadow color Black.
Selections-Invert.
Flood Fill the small frame with your Background color.
Selections-None.
In your layer palette, highlight the middle layer, the doily.
Adjust-Sharpen-Unsharp Mask, Radius at 2, Strength at 50, Clipping at 5 and Luminance only Checked.
Now, in your layer palette, highlight the top layer, the tube.
Repeat the Unsharp Mask on the tube.
Effects-3d-Drop shadow with Vertical and Horizontal at 1, Opacity 100, and Blur at 5, Shadow color Black.
Add your desired text.
I added a drop shadow to the text, V & H at 0, Opacity 100, Blur 10, Shadow color White.
Repeat the Drop Shadow.
Layers-Merge-Merge All.
File-Export-JPG optomizer, name it and save it to a file you will remember.
You are done with the Tag!!
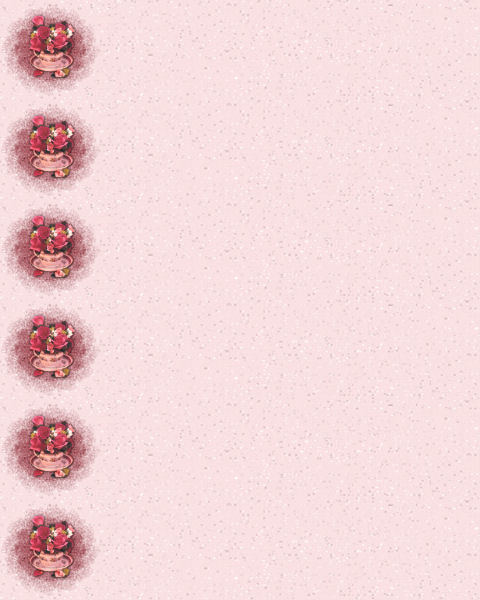
Part 2, using the same doily you made, we're going to make a Strip you can use.
You are done with your Teacup tag and can close it if you followed the steps to save it.
File-New.
1500 x 300, Raster and Transparent.
Flood fill it with your Foreground color.
Adjust-Add/Remove Noise-Add Noise.
Same settings as before, and if you haven't changed it since starting this tut it will be the same as we used above.
Effects-Texture-Mosaic-Antique with the same settings.
Effects-Image Effects-Seamless tiling at the default settings.
Change your Foreground color to White.
Pick your Flood Fill tool and change the settings to these.
Flood fill the background with white.
If you click on the little bucket icon you can save this setting as a Preset by clicking on the top circled icon on the right and give it a name.
I got this from a tut I did somewhere and wish I could give credit for it. I use it a lot to soften backgrounds.
Even if you don't save it, by opening the bucket, you can click on the second circled icon on the right to restore it to defaults.
I can't tell you how many times I wanted a regular flood fill and had forgotten to change this back!!
Restore the Doily.psp file you minimized earlier.
Edit-Copy.
Activate your long strip.
Edit-Paste as a New Layer.
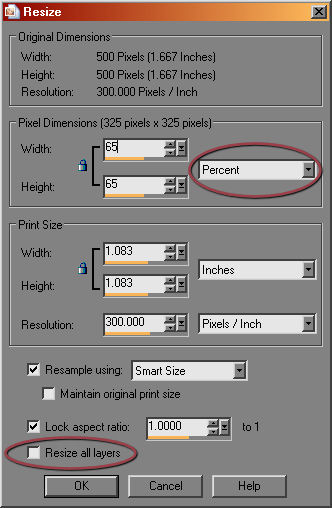
Image-Resize by 65%, make sure Resize All layers is Not checked.
With your Mover tool, move the doily to the left side and try to center it up and down.
Adjust-Sharpen-Unsharp Mask with the previous settings.
Activate your tube.
Edit-Copy.
Activate your long strip.
Edit-Copy-As a new layer.
Image-Resize, by 35%.
With your Mover tool, move it to center in the doily.
Effects-3d-Drop shadow, V & H at 1, Opacity 100, Blur 10, Shadow color Black.
If you wish to add text, do so now :-)
Layers-Merge-Merge All.
File-Export-JPG optomizer, name it and save it to a file you will remember.
You are done with the strip!!
Now we are going to use this strip to make a printable stationery for you to send Snail Mail on :-)
Be warned though, it can eat up printer ink!!
And yet, how Wonderful to create your own personal stationery!!
OK. Several repetitive steps here, just change the numbers.
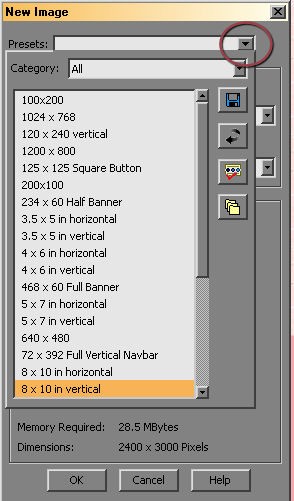
First, File, New.
Click the Arrow at Presets and find the 8x10 Vertical and choose that.
Now choose your Selection tool with these settings, and click on the circled icon to make a Custom Selection.
In the Custom Selection window that comes up, make the settings Top 0, Left 0, Right 2400 and Bottom 500.
Activate your Strip and Edit-Copy.
Activate your New image and Edit-Paste Into Selection.
Selections-None
Choose the Custom Selection icon again, make the settings, Top 500, Left 0, Right 2400, Bottom 1000.
Edit-Paste into Selection.
Selections-None.
Again the Custom Selection icon, Top 1000, Left 0, Right 2400 and Bottom 1500.
Edit-Paste into Selection.
Selections-None.
Again the Custom Selection icon, Top 1500, Left 0, Right 2400, Bottom 2000.
Edit-Paste into Selection.
Selections-None.
Another time the Custom Selection icon, Top 2000, Left 0, Right 2400, Bottom 2500.
Edit-Paste into Selection.
Selections-None.
Again the Custom Selection icon, Top 2500, Left 0, Right 2400, and Bottom 3000.
Edit-Paste into Selection.
Selections-None
Now you have a full page to save and print to use.
File-Export-JPG optomizer, name it and save to a folder you will remember.
I hope you have enjoyed this tut and learned something from it :-)

This tutorial is simply from my play. Any resemblance to other tutorials is accidental.
My Terms of Use for this tutorial are as follows: You may send the link to this tutorial, but Not the tutorial itself, to whomever you think will have fun with it. Groups are welcome to use the tutorial.
This page and tutorial are copyright to Janie Shipman, July 2008.
This site is best viewed at 1024x768, in Internet Explorer 6+.