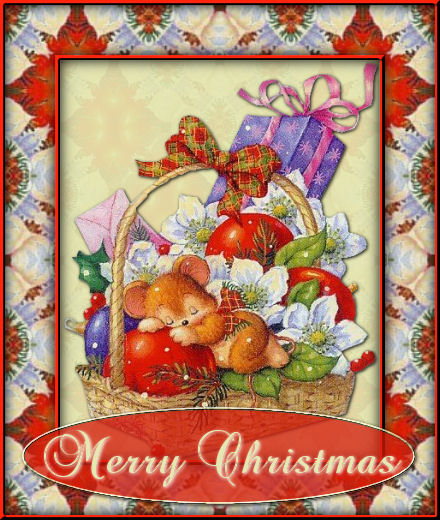
For this tutorial you will need a tube.
No outside filters are used.
Open your chosen tube in PSP. Shift+D to duplicate, twice. Close the original.
Choose a light color from the tube for the Foreground color, and a dark color for the Background.
Activate one of the tubes you copied, we're going to start by making the pattern.
Effects-Reflection Effects-Rotating Mirror with these settings.
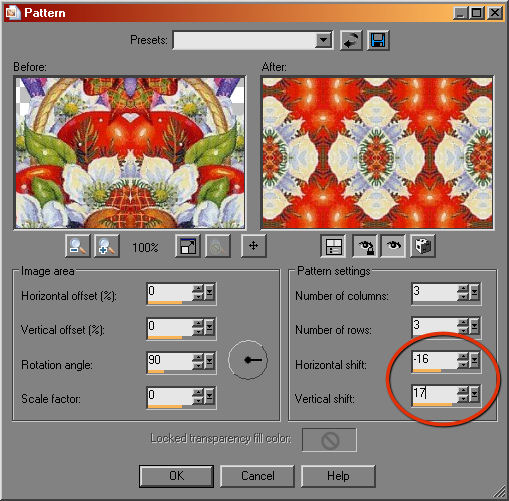
Effects-Reflection Effects-Pattern with these settings.
Depending on the tube you use, you may need to adjust the Horizontal and Vertical settings so the rows are evenly centered.
Effects-Image Effects-Seamless Tiling.
You are done with the pattern :-)
If you like it, you can always save it to your patterns folder to use it again.
I used the one I made for the top example also as a pattern fill, scale set at 50%, for the Back Button at the bottom of this tut :-)
Edit-Copy the Pattern.
Now, activate the second copy of the tube you made.
Edit-Paste as a New Layer.
In your layer palette, drag the pattern layer below the tube layer.
With the Pattern layer highlighted, Add a new Raster layer.
Flood fill the new layer with white and lower the opacity to about 90%.
Highlight the tube layer and add a Drop Shadow, I used V & H at 1, Opacity 100, Blur 5 and black for the color.
Layers-Merge All.
Image-Add Borders, 5 px symetrical.
With your Magic Wand, tolerance and feather set to 0, choose the border.
Selections-Invert.
Selections-Float.
Effects-3d-Cutout, V & H at 0, Opacity 100, Blur 15.
Selections-Defloat.
Selections-Invert.
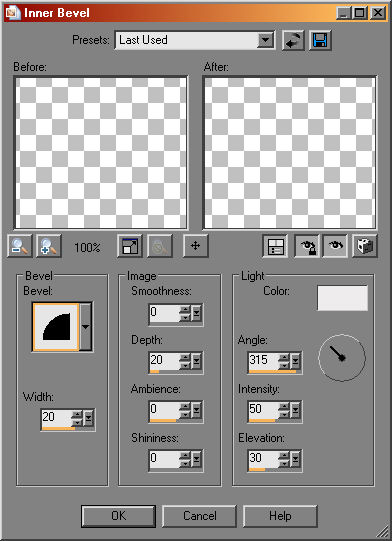
Effects-3d-Inner Bevel with these settings.
Selections-None.
Image-Add Borders, 50 px symetrical, a different color from the first border.
With your Magic Wand, choose the new border.
Activate your Pattern, Edit-Copy.
Back to your new picture, Edit-Paste Into Selection.
While still selected, Effects-3d-Cutout, same setting as before.
Selections-None.
Image-Add Borders, 5px symetrical.
With your Magic Wand, select the new border.
Effects-3d-Inner Bevel with the same settings as before.
We really don't have a place to add any text that would show up, so, we're going to add a text box :-)
Choose your Preset Shape tool with these settings.
Draw out your text box about where you want it.
Now you can stretch or squish it by grabbing the little boxes on the sides.
When you are happy with it, lower the opacity of that layer to 90%.
Layers-Convert to Raster Layer.
Choose your Text tool.
I always create text as a Vector because it is easier to adjust.
You can grab it in the middle and move it, you can grab the sides and stretch it or squish it, you can make it taller or shorter.
The size will depend on the font you use, even though you can stretch and squish it, too much of that will make the text "fuzzy". It works best to be close to the size you want in the end.
Once you have your text placed and are happy with it, Effects-3d-Drop Shadow with the last settings.
Layers-Merge All.
File-Export-JPG Optimizer, with the Compression value set to 20, name your tag and save it to the desired folder......don't close your working copy just yet......
You're done!!
Well,
Unless,
You want to play a little more......:-)
Scroll on down to the bottom of the page to see my second example for this tut.
I just could Not resist animating those Christmas lights!!
To animate your lights like I did, with your merged and finished picture still active in the workspace, Layers-Duplicate, and again Layers-Duplicate.
Now you have 3 identical layers in your layer palette.
Close the eye on the top 2 layers and highlight the bottom layer.
Choose your zoom tool and set the percentage to 200.
Choose your Lasso tool, you can find it in the flyout with the Magic Wand, with these settings.
Since we have 3 layers, we're going to pick every third light. I started with the blue bulb on the bottom left.
Click on the edge of a light, click again a bit farther down the edge of the light. You will see a spider web following your clicks. Keep clicking around the bulb to circle the whole thing and then double click at the beginning to close the selection end.
You don't have to worry about being precise, you are zoomed in to make it easier to see, but when it's back to normal size you won't be able to see that this angle is a little too sharp or you got a little out of the bulb there :-)
With the first bulb selected, skip the next 2 and lasso the third bulb.
One note here, I'm using PSP10, and I can keep making selections without losing the last one, but I seem to remember not all versions can do that. If that's your case, you will need to do the next step for each bulb you lasso.
Remember we are doing every third bulb for layer 1.
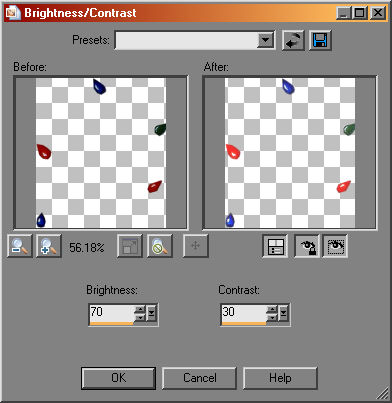
When you're done making your selections, Adjust-Brightness/Contrast with these settings.
When you have every third bulb "lit up" in layer 1, open layer 2 and highlight it.
Selections-None.
For this layer I started with the green bulb on the bottom left, skipped the next two, selected the third again all the way around.
Repeat the Adjust-Brightness/Contrast for this layer.
Open the top layer, and repeat your 3rd bulb selections starting from the yellow bulb on the bottom left.
Repeat the Adjust-Brightness/Contrast.
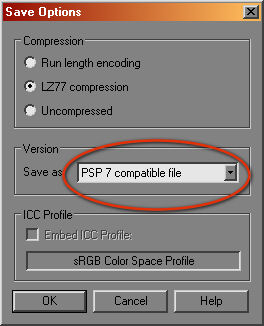
File-Save As, give it a name you can remember, as a .psp file, and before you hit save, make sure to save it as a PSP7 compatible file by choosing Options first and choosing that from the drop-down menu as below.
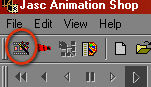
Animation Shop has not been upgraded since then.....LOL
Open Animation Shop.
Click on the little Wizard icon just under File.
Tick Same size as the first image frame.
Tick Opaque with black as the color in the next window.
Tick Upper left and With the canvas color in the next window.
Tick Yes, repeat the animation, and 25 as How Long in the next window.
In the next window, click on Add Image and locate the file you saved.
Then click Next, and Finish in the last window.
Your animation is created!
View-Animation and you will see how it looks.
File-Save As, name it and Save.
I also added 4 Sparkles to the zip file of supplies you could use to add some sparkle to your tag :-)
You're done Again!!
I hope you enjoyed it :-)