For this tutorial you will need a graphic.
Extract it to your plugins folder before opening PSP.
Except for the plugin, this is a very simple tutorial. If you have not tried working with plugins, perhaps now is a good time to try :-)
If you just are not up to working with plugins, I will list another option at that point.
Open your chosen graphic in PSP. Shift+D to duplicate. Close the original.
Choose a light color from the graphic for the Foreground color, and a dark color for the Background.
Open the corners in PSP if you wish to use them.
Activate your graphic.
Selections-Select All.
Selections-Float.
Effects-3d-Cutout with these settings.
Selections-Defloat.
Selections-None.
The next step we are going to repeat several times. It will start at *** and end at ***** :-)
***
Image-Add borders, 2 px symetrical, your dark color.
Image-Add borders, 2 px symetrical, your light color.
Image-Add Borders, 2 px symetrical, your dark color.
*****
We will repeat this next border as well, it will begin with +++ and end with +++++
+++
Image-Add Borders, 10 px symetrical, your light color.
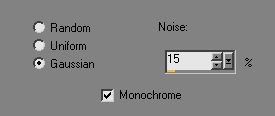
With your Magic Wand, tolerance at 0, select this border.
Adjust-Add/Remove Noise-Add Noise with these settings.
Effects-Plugins-Greg's Factory Output Vol2-Pool Shadow at the Default settings.
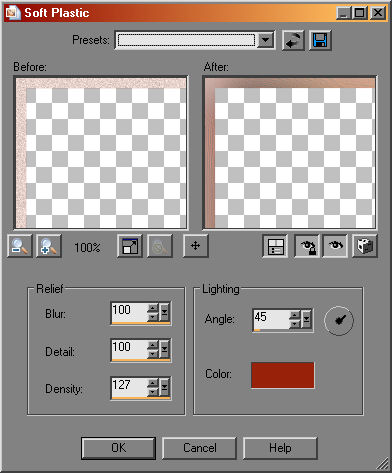
OR, The closest to this effect I can get in PSP alone takes 2 steps.
Effects-Texture Effects-Soft Plastic with these settings. I also changed the color to my Background color.
Then, Adjust-Brightness/Contrast-Brightness/Contrast, with Brightness at 30 and Contrast at 10.
Selections-None.
+++++
As you can see, this is a bit like using the plugin, best I can do :-)
Plugins are handy tools!!
Selections-None.
***Repeat the 2 px borders*****
Image-Add Borders, 20 px symetrical, your light color.
With your Magic Wand, select this new border.
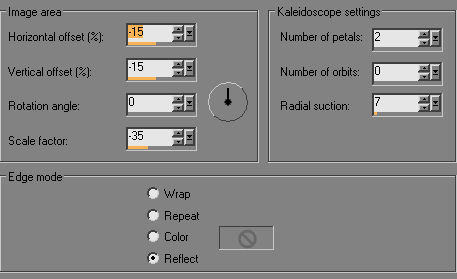
Effects-Reflection Effects-Kaleidoscope with these settings.
Selections-Float.
Effects-3d-cutout, same settings as before.
Selections-Defloat.
Selections-None.
***Repeat 2 px borders*****
+++Repeat 10 px border+++++
***Repeat 2 px borders*****
Your basic frame is done!!
If you wish to add the corner, I have included 2 versions, one gold, and the other colorized to match the graphic I used.
You can colorize your own to match the graphic you choose.
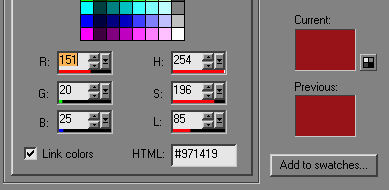
In your Materials window, with the color you wish to match, check the H and S Numbers, here my Hue is 254 and Saturation 196.
Activate your corner, and for this, I'm starting with the Gold corner.
Adjust-Hue and Saturation-Colorize.
Change the settings to match your numbers.
In my case here, it was still a bit too pink.
Adjust-Brightness/Contrast, I set the Brightness to -73 and Contrast to 10.
That brought the color down to closer to the dark red of my graphic :-)
Now you have your corner as you like.
With your corner active, Edit-Copy.
Activate your main graphic.
Edit-Copy-As a New Layer.
With your Mover Tool, move it to the upper left corner and place it as you like.
In my example above, I placed the corner on both "noise" borders so would repeat the process twice.
Once the corner is placed in the upper left border, in the layer palette, right click on the top layer and Duplicate.
Highlight the new layer, and Image-Mirror.
Again in the layer palette, right click on the top layer and Duplicate.
Highlight the top layer and Image-Flip.
Once more in the layer palette, highlight the top layer and Duplicate then Image-Mirror.
Now your corner should be in all four corners :-)
Add text as you wish.
For this I used Fiolex Girls, size 60.
With a drop shadow of H&V 0, Opacity 100, Blur 10, repeated about 3 times.
You're done!!
I hope you enjoyed it :-)