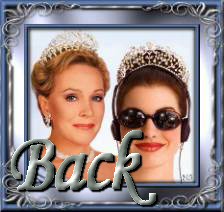
Princess Frame
Written for PSP8 by
Natalie

Supplies Here. Unzip the mask to your masks folder and the silver tile into your patterns folder.
Greg's Factory 2 Here. Unzip into your plugins folder.
1. Open a
graphic file and make a duplicate; minimize the original. Resize and Adjust > Sharpen if
necessary.
2. Select
two colours from your graphic, a lighter one and a darker
one.
3. Image
> Add Borders (symmetrical checked) of 8px, and flood fill with one of your
selected colours. Then go to
Effects > 3D Effects > Inner Bevel with the following
settings:
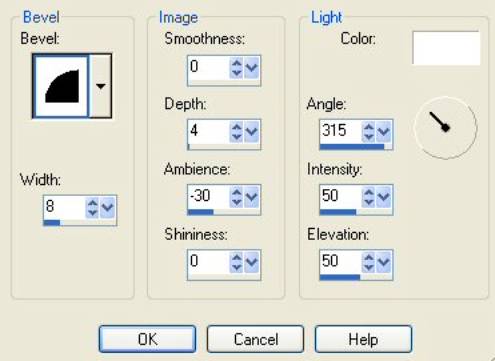
Selections > Invert.
Effects > 3D Effects > Cutout with the following
settings:
Repeat the Cutout effects with Vertical and Horizontal at minus
2. Selections >
None.
4. Image
> Add Borders with a width of 35 px.
Flood fill with the other selected colour.
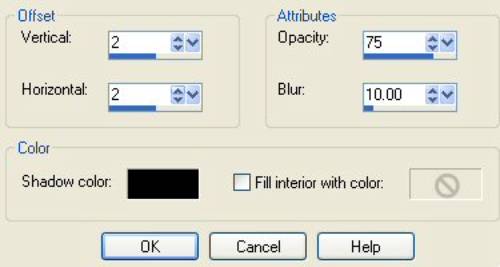
5. Effects
> Plugins > Gregs Factory Output Vol. II > Pool Shadow at the default
settings > Okay. Select
None.
6. Image
> Add Borders of 15 px with the first colour. Effects > Inner Bevel with the same
settings as before. Selections >
Invert and apply the Cutout as before, plus and minus 2. Deselect.
7. On your
Layers Palette add a New Raster Layer.
Flood Fill with a silver tile from your Patterns
folder.
8. Layers
> Load/Save Mask From Disk > JD Mask 47. Right click on Mask layer and select
Delete. When the popup asks if you
wish to merge into the layer below, click Yes.
9. Selections
> All. Selections >
Float. Adjust > Sharpness >
Sharpen. Effects > 3D Effects
> Inner Bevel with the same settings as before. Selections >
None.
10.
Effects
> 3-D Effects > Drop shadow with the following
settings:
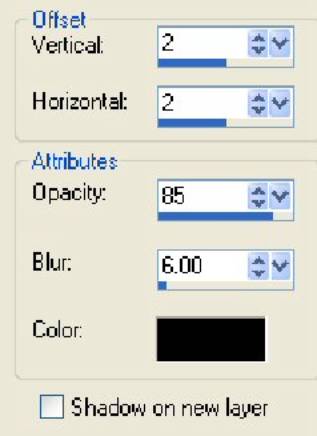
Deselect. Selections
> Merge All. Save as. You are done!
;o)